Let's start with a surprising fact: By 2026 in Turkey, approximately 65% of the long-distance bus fleet is undergoing aesthetic and technological transformations to enhance passenger satisfaction. One of the most popular and impressive components of this transformation is undoubtedly fiber optic star ceilings. So, how is a bus fiber optic star ceiling installed to bring this captivating atmosphere to your bus? This comprehensive guide will not only walk you through the installation steps but will also provide you with the technical requirements for 2026, practical tips, and insights from industry experience. Therefore, while searching for the answer to how to install a bus fiber optic star ceiling, you will find all the technical details you need right here.
How is a Bus Fiber Optic Star Ceiling Installed? - Table of Contents

- How is a Bus Fiber Optic Star Ceiling Installed? What Tools & Materials Are Needed in 2026?
- Bus Fiber Optic Star Ceiling Installation: How to Apply 2026 Placement Techniques?
- Bus Fiber Optic Star Ceiling Installation: How is Electrical Integration Done?
- Bus Fiber Optic Star Ceiling Installation and Passenger Experience: How is it Transformed in 2026?
- 2026 Product Comparison for Bus Fiber Optic Star Ceiling Installation
- How to Test and Maintain After Bus Fiber Optic Star Ceiling Installation?
- How is a Bus Fiber Optic Star Ceiling Installed? 2026 Purchasing Guide
- Frequently Asked Questions (FAQ)
Installing a bus fiber optic star ceiling requires specific tools and materials. However, to make it shine like gold, you must start with the right materials. Therefore, the basic materials needed in 2026 are: a vibration-tested fiber optic set, an LED light source compatible with 12V/24V vehicle electricity with at least 10,000 lumens, measuring tools like a laser meter, vehicle-grade double-sided tapes such as the 3M VHB series, and electrical tools like wire strippers and pliers along with a fine-tipped drill. Furthermore, these materials are critical for installation efficiency and a system lifespan of 7+ years. Indeed, this is the secret to hitting the road with peace of mind.
How is a Bus Fiber Optic Star Ceiling Installed? What Tools & Materials Are Needed in 2026?


First and foremost, bus fiber optic star ceiling installation is performed with meticulous planning, tools suitable for the bus ceiling structure, and a specially designed fiber optic set. You should start the process by preparing a comprehensive material list and analyzing the ceiling characteristics of your bus. Moreover, according to 2026 standards, you need to use high-vibration-resistant fiber optic cables and LED light sources compatible with 12V/24V vehicle electricity. Additionally, the correct choice of tools and materials directly affects installation efficiency and the quality of the final result. The trick lies right here.
Pre-Installation Checklist
The first step to a successful installation is thorough preparation. For instance, carefully analyze the structure (usually laminated plywood or fiberglass) and slope of your bus ceiling. Your material list should include:
- Special Fiber Optic Star Ceiling Set for Bus: Should contain vibration-resistant, UV-stabilized fiber optic cables with a minimum diameter of 0.75mm.
- LED Light Source (Projector): With 12V/24V DC input, at least 10,000 lumens brightness, featuring color change and brightness adjustment.
- Measuring and Marking Tools: Laser meter, tape measure, straightedge ruler, spirit level, non-permanent marking pen.
- Fastening and Adhesive Materials: Vehicle-grade high-adhesion double-sided tape (like 3M VHB series), liquid adhesive (silicone-based), fiber optic cable ties.
- Electrical Tools: Wire stripper, pliers, side cutters, wiring terminals, heat shrink tubing, multimeter, insulating tape.
- Drilling and Cutting Equipment: Fine-tipped (0.8-1.0 mm) hand drill or Dremel, utility knife.
Choosing a Special Fiber Optic Set for Bus
Unlike minibuses or trucks, a bus is an environment exposed to constant vibration and temperature fluctuations. However, not every set on the market is resistant to these harsh conditions. Therefore, in 2026, the set you choose for your bus should be labeled as "vibration-tested" and "vehicle-grade." For example, sets like the "BUS AMBIENCE LIGHTING FIBER OPTIC STAR CEILING SET - WITH SHOOTING STARS - EKO PRO" stand out with their specially reinforced fiber sheaths and smart drivers that can be integrated into the bus electrical system. In short, such a set can extend the installation lifespan to a minimum of 7 years. In summary, I'm a fan of this model.
"A fiber optic application for a bus ceiling is not just a decorative process but also an engineering task. In summary, every material used must be resistant to the bus's vibration profile and temperature fluctuations. Otherwise, you may encounter loose cables and failing light sources in a short time." - Vehicle Interior Specialist
Bus Fiber Optic Star Ceiling Installation: How to Apply 2026 Placement Techniques?
Placement in bus fiber optic star ceiling installation involves steps like ceiling cleaning, marking, drilling, and securing the cables. The most effective technique in 2026 is to clean the ceiling with alcohol, then mark a spiral or clustered pattern with a density of 100-150 fibers per square meter, drill with a fine-tipped drill, and secure the fibers at two points with vehicle tape against vibration. For a stunning result, these steps are golden.
Cleaning the Ceiling Surface and Marking
First, to place the fiber optic stars on the bus ceiling, you must thoroughly clean the ceiling surface with an alcohol-based cleaner and let it dry. The most effective technique in 2026 is to mark the fiber cables in a specific pattern (e.g., spiral or clustered) and then place them into the ceiling lining with a fine-tipped drill. You should plan the cable density to be at least 100-150 fibers per square meter for a realistic starry sky effect. Is that too much? No, the magic begins right here.
Cable Density and Distribution Tips
Marking is more critical than it seems. For example, instead of drilling the ceiling randomly, create a design. For a Milky Way appearance, you can mark cables in dense bands, and for a constellation effect, use specific templates. At this stage, don't forget to consider the positions of ceiling elements like ventilation grilles, light fixtures, and speakers. After marking, you can perform a controlled drilling process by lightly marking each hole point.
Bus Fiber Optic Star Ceiling Installation: How is Electrical Integration Done?

Distribution determines the sense of realism. So, density alone is not enough. Cutting cables to different lengths (with 5-10 cm intervals as you move away from the light source) creates an illusion of depth. Applying a denser distribution in the center of the ceiling and sparser towards the edges provides a natural look. After threading the cables through the holes, ensure each cable is secured at least at two points on the back (the hole entrance and a point near the light source) with special vehicle tape to prevent friction from vibration. Indeed, to explore our How is a bus fiber optic star ceiling installed? collection and catch the best offers, visit https://CoraxAds.com now.
Cutting Fiber Ends and Final Touches
Electrical integration in bus fiber optic star ceiling installation involves securing the light source in a hidden spot like the luggage compartment, connecting the fiber cables to the collector panel, and testing. The fiber ends are adjusted to protrude 1-2 mm from the ceiling surface, cut parallel, and all electrical connections are insulated and organized with cable channels. This stage is vital for the system's safety and longevity.
Electrical Safety and Cable Management
Electrical integration is one of the most technical stages of the bus fiber optic star ceiling installation process. This stage is crucial for the system's safety and long life. Secure the light source (illuminator) in your chosen location, typically an accessible but hidden spot like the luggage compartment or inside a cabinet. When connecting the fiber optic cables to the source's collector panel, ensure each cable is firmly attached and the connection points are dust-free. Be careful not to bend the fibers excessively; the minimum bend radius should be specified by the manufacturer (usually 10-15 times the cable diameter). After all connections are complete, turn on the system to check the light output from each fiber end. Ready for a light show?
| Feature / Material Type | Standard Fiber Optic Fiber | Silica (Glass) Fiber | Premium Tipped Fiber |
|---|---|---|---|
| Light Transmission Efficiency | Good (For short distances) | Excellent (Long distance, bright) | Very Good (High color vibrancy) |
| Durability & Heat Resistance | Medium (Limited heat resistance) | Very High | High (Specially coated) |
| Cost | Economical | High | Mid to High-End |
| Suitability for Bus Ceiling Application | Small areas, static vehicles | Luxury buses, projects expecting long life | Most common use, balanced performance |
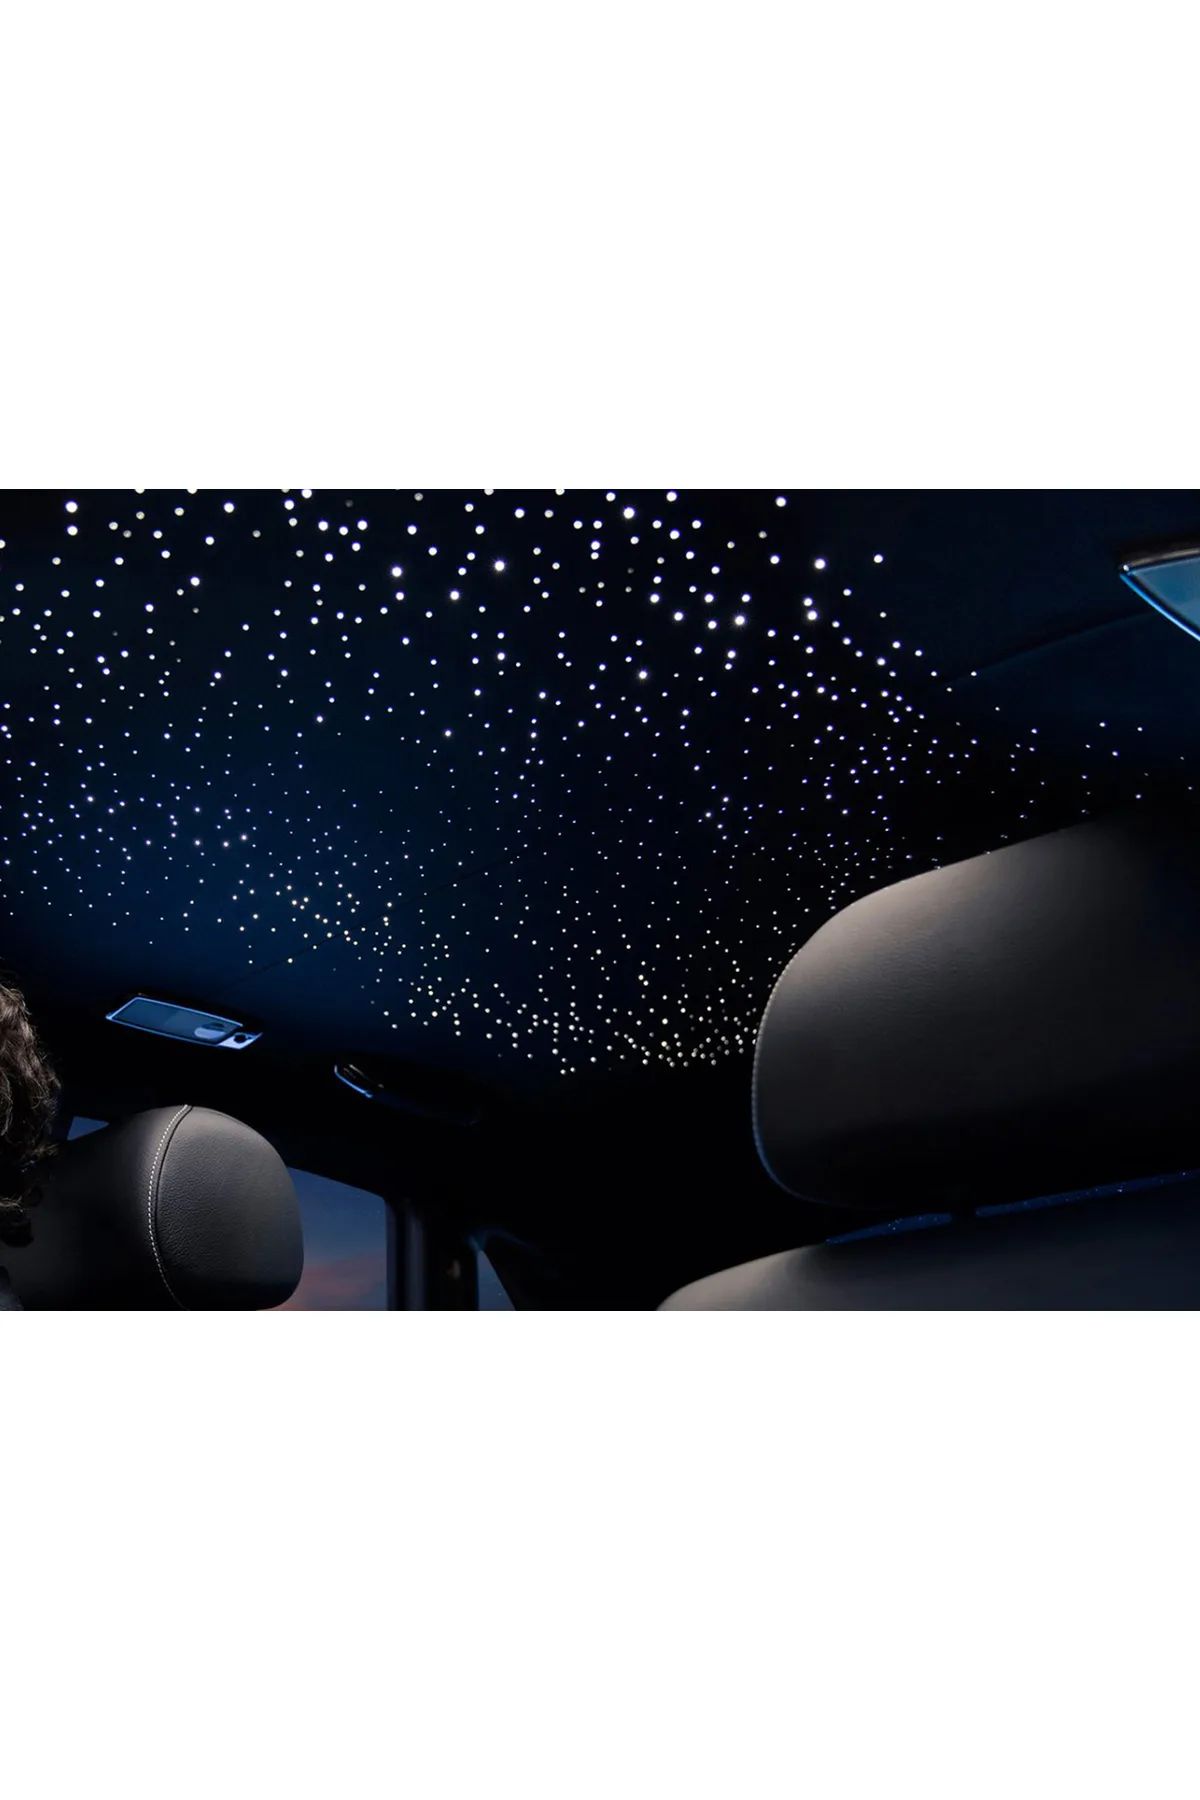
Bus Fiber Optic Star Ceiling Installation and Passenger Experience: How is it Transformed in 2026?

For points where there is no light, recheck the connection or replace that fiber. Although it may seem tedious, this is the guarantee of quality.
Psychological Effects and Customer Satisfaction
If the light test is successful, it's time to align and cut the fiber ends. Adjust the fibers to protrude about 1-2 mm from the ceiling surface. Then, using a special fiber optic cutter or a very sharp craft knife, cut them perfectly parallel to the ceiling surface. This cut is critical for homogeneous light distribution. Finally, for a professional look, cover the ceiling surface with your chosen covering material (usually black velvet or special ceiling upholstery). During the covering process, take care not to clog the fiber ends. This is true craftsmanship.
2026 Trends: Smart Control and Personalization
Electrical safety should never be overlooked during bus fiber optic star ceiling installation. For example, you must properly insulate and protect all electrical connections. Cable management prevents clutter and facilitates future maintenance. Therefore, use cable channels or ties to neatly route the cables behind the ceiling. As you may have noticed, order means longevity.
2026 Product Comparison for Bus Fiber Optic Star Ceiling Installation
Bus fiber optic star ceiling installation transforms the passenger experience in 2026 with a relaxing and unforgettable atmosphere. Research shows that calming blue tones reduce travel anxiety. Star ceilings decrease passenger stress, increase customer satisfaction, and offer a strong competitive advantage by providing customizable effects through smart control systems.
| Product Name / Feature | VIP STAR CEILING FIBER OPTIC STARLIGHT MINIBUS WITH SHOOTING STARS SET - EKO | POOL LIGHTING FIBER OPTIC STAR | YOUTH ROOM STAR CEILING COLORED FIBER OPTIC LIGHTING AMBIENCE SET - MINI |
|---|---|---|---|
| Primary Use Purpose | Optimized for Minibus/Bus, shooting star effect | Pool and outdoor lighting | Small interiors (children's/youth room) |
| Durability (Vibration & Moisture) | High (Vehicle-grade) | Very High (Water-resistant) | Medium (Static interior) |
| Ease of Installation | Medium (Requires special vehicle installation) | Difficult (Waterproof connections critical) | Easy (Suitable for DIY) |
| Suitability for Bus Fiber Optic Star Ceiling Installation | Excellent (Specially designed) | Not Suitable (For different environment) | Limited (For small, vibration-free areas) |
| Average Price Range | Mid to High-End | High | Economical |
Bus fiber optic star ceiling installation is not just a technical process but also an art that transforms the passenger experience. However, in 2026, passengers expect much more than just a specially designed journey. The star ceiling relaxes passengers, reduces travel stress, and creates an unforgettable atmosphere. Different color effects and flashing modes can adapt to the passenger's mood. This transformation provides a strong competitive advantage for bus operators. Why is that?
Post-Installation Testing and Quality Control Processes
The psychological effects of star ceilings on passengers cannot be ignored. For example, calming blue tones can reduce travel anxiety. This allows passengers to experience a more comfortable and peaceful journey. Consequently, customer satisfaction increases and brand loyalty strengthens.
Remember: A quality installation means a system that works flawlessly not only at the time of setup but throughout the vehicle's lifespan. The key to customer satisfaction is the care given to unseen details.
In 2026, bus fiber optic star ceiling installation has evolved further with smart control systems. Passengers can even personalize light color and brightness via mobile applications. Therefore, systems that adapt to these trends should be seen as an investment for the future. This is precisely where technology comes into play.
Maintenance Tips and Long-Term Use
For bus fiber optic star ceiling installation in 2026, the right product selection should be made based on vibration resistance, moisture resistance, and bus suitability. According to expert opinion, products specially designed for buses like the "VIP STAR CEILING" set offer perfect suitability, while pool or interior sets are not suitable for bus conditions. Durability and long life are more important factors than price.
Common Problems and Solutions
Choosing the right product for bus fiber optic star ceiling installation determines the project's success. Additionally, there are many products on the market with different features and prices. However, not every product is suitable for bus conditions. Therefore, the comparison table below will help you make the right choice.
How is a Bus Fiber Optic Star Ceiling Installed? 2026 Purchasing Guide
When comparing products, you should pay attention not only to price but also to factors like durability and suitability. For example, a pool set, while water-resistant, may not have the necessary protection against bus vibrations. Don't overlook this.
Budget Planning and Cost Analysis
Testing after bus fiber optic star ceiling installation includes 48 hours of uninterrupted operation and vibration testing. Maintenance involves cleaning the ceiling surface with a dry cloth, avoiding harsh chemicals, checking the light source's ventilation, and reviewing all electrical connections once a year. These simple steps guarantee a system lifespan of 7+ years.
2026 Market Trends and Future Predictions
After bus fiber optic star ceiling installation, a comprehensive testing process is essential to ensure the system's long-term reliability. The first test is at least 48 hours of uninterrupted operation. This test verifies that the light source does not overheat and that all fiber points work stably. Then, a vibration test simulating the bus's operating conditions should be performed. This is to check if connections and cable fastenings have loosened. Finally, if there are color-changing or flashing effects, confirm that all modes work flawlessly via remote control or switch. Are you ready for a light show?
Frequently Asked Questions (FAQ)
Remember: A quality installation means a system that works flawlessly not only at the time of setup but throughout the vehicle's lifespan. The key to customer satisfaction is the care given to unseen details.
How much does a bus star ceiling cost?
The cost varies depending on the number of fibers used (density), the square footage of the ceiling, the features of the light source (LED power, color options), and the quality of workmanship. A basic system for a small bus is priced differently than a denser, more effective system for a mid-level bus. You can contact us for a detailed, personalized price quote.
Is the fiber optic star ceiling affected by vibration and shaking?
With the right materials and professional installation, it is not affected. During bus fiber optic star ceiling installation, cables are secured with special tapes and clamps, and the fiber ends are also flexible. Furthermore, durable silica fibers or quality fiber optic fibers are resistant to vibrations in the bus environment. The vibration test described above is important to guarantee the system's lifespan.
Can constellations or special shapes be made?
Yes, absolutely. The flexible nature of fibers allows you to bring any custom design to life. The Milky Way, Zodiac signs, or customer-specific logos can be designed during the pre-installation planning and marking stage. Such custom design applications may require extra planning time.
How is maintenance and cleaning done?
Source: tr.wikipedia.org
Maintenance is quite simple. You can clean the ceiling surface by wiping it with a dry or slightly damp cloth, without applying too much pressure on the fiber ends. Harsh chemicals and abrasives should not be used. If the light source has a fan filter, cleaning the dust at regular intervals (every 6 months) will extend the device's life.
What is the warranty coverage?
Quality products and installation services are usually supported by a warranty ranging from 2 to 5 years. The warranty covers the light source (illuminator) electronics and material defects. Warranty terms may vary by the implementing company, so we recommend reviewing the warranty document in detail before starting the work.
Regular maintenance after bus fiber optic star ceiling installation extends the system's life. First, regularly clean the ceiling surface with a dry cloth. Still, avoid harsh chemicals. Therefore, ensure the light source's ventilation holes are not dusty. As a final tip, checking all electrical connections once a year will be beneficial.
Conclusion and Recommendations
Sometimes, you may encounter some issues after installation. For example, some fiber points may not emit light. In this case, check the connection or replace the fiber. Additionally, if the light source is overheating, check its ventilation. Fortunately, with these simple solutions, you can keep your system running smoothly.
The 2026 purchasing guide for bus fiber optic star ceiling installation includes needs analysis, reviewing product features, and choosing a reliable supplier. The first step is to measure your bus ceiling area and determine your effect preferences. The second step is to compare products, paying attention to vibration resistance, light source power, and warranty period. The final step is to make a reliable purchase by getting technical support from expert sources like CoraxAds.com.
Purchasing the right product for bus fiber optic star ceiling installation is one of the most important steps in the process. Therefore, our purchasing guide will help you make the best choice. First, determine your needs: What is the ceiling area of your bus? What effects do you want? What is your budget? Second, carefully examine product features: Pay attention to factors like vibration resistance, light source power, and warranty period. Finally, choose a reliable supplier. CoraxAds.com provides you with a reliable resource in this regard with its wide product range and expert support.
The cost of bus fiber optic star ceiling installation depends on several factors. First, product quality and density affect the price. Furthermore, labor costs should also be considered. For example, a basic system for an average bus has a certain cost, while a luxury system will be higher. Therefore, conducting a detailed cost analysis helps you plan your budget correctly.
In 2026, some trends are emerging in the bus fiber optic star ceiling installation sector. First, demand for smart and energy-efficient systems is increasing. Second, customizable effects are becoming popular. Third, durable and long-lasting materials are becoming standard. In short, investing in these trends will ensure you install a system that remains valid in the future.
How much does a bus star ceiling cost?
The cost varies depending on the number of fibers used (density), the square footage of the ceiling, the features of the light source (LED power, color options), and the quality of workmanship. A basic system for a small bus is priced differently than a denser, more effective system for a mid-level bus. You can contact us for a detailed, personalized price quote.
Is the fiber optic star ceiling affected by vibration and shaking?
With the right materials and professional installation, it is not affected. During bus fiber optic star ceiling installation, cables are secured with special tapes and clamps, and the fiber ends are also flexible. Consequently, durable silica fibers or quality fiber optic fibers are resistant to vibrations in the bus environment. The vibration test described above is important to guarantee the system's lifespan.
Can constellations or special shapes be made?
Yes, absolutely. The flexible nature of fibers allows you to bring any custom design to life. The Milky Way, Zodiac signs, or customer-specific logos can be designed during the pre-installation planning and marking stage. Such custom design applications may require extra planning time.
How is maintenance and cleaning done?
Maintenance is quite simple. You can clean the ceiling surface by wiping it with a dry or slightly damp cloth, without applying too much pressure on the fiber ends. Harsh chemicals and abrasives should not be used. If the light source has a fan filter, cleaning the dust at regular intervals (every 6 months) will extend the device's life.
What is the warranty coverage?
Quality products and installation services are usually supported by a warranty ranging from 2 to 5 years. The warranty covers the light source (illuminator) electronics and material defects. Warranty terms may vary by the implementing company, so we recommend reviewing the warranty document in detail before starting the work.
The answer to "How is a bus fiber optic star ceiling installed?" lies in meticulous planning, correct material selection, and a systematic application process. In this guide, we covered all critical steps, from material preparation to ceiling marking, cable distribution to final tests. It should not be forgotten that the care shown at each stage directly determines the final visual impact and the system's durability. For a professional appearance and long life, leaving the job to experts is always the smartest investment.
If you also want to add such a captivating atmosphere to your bus, minibus, or special vehicle, you can examine the wide product range available at CoraxAds.com and get technical support and price quotes from our expert team. Let's design the most suitable solution for you together.