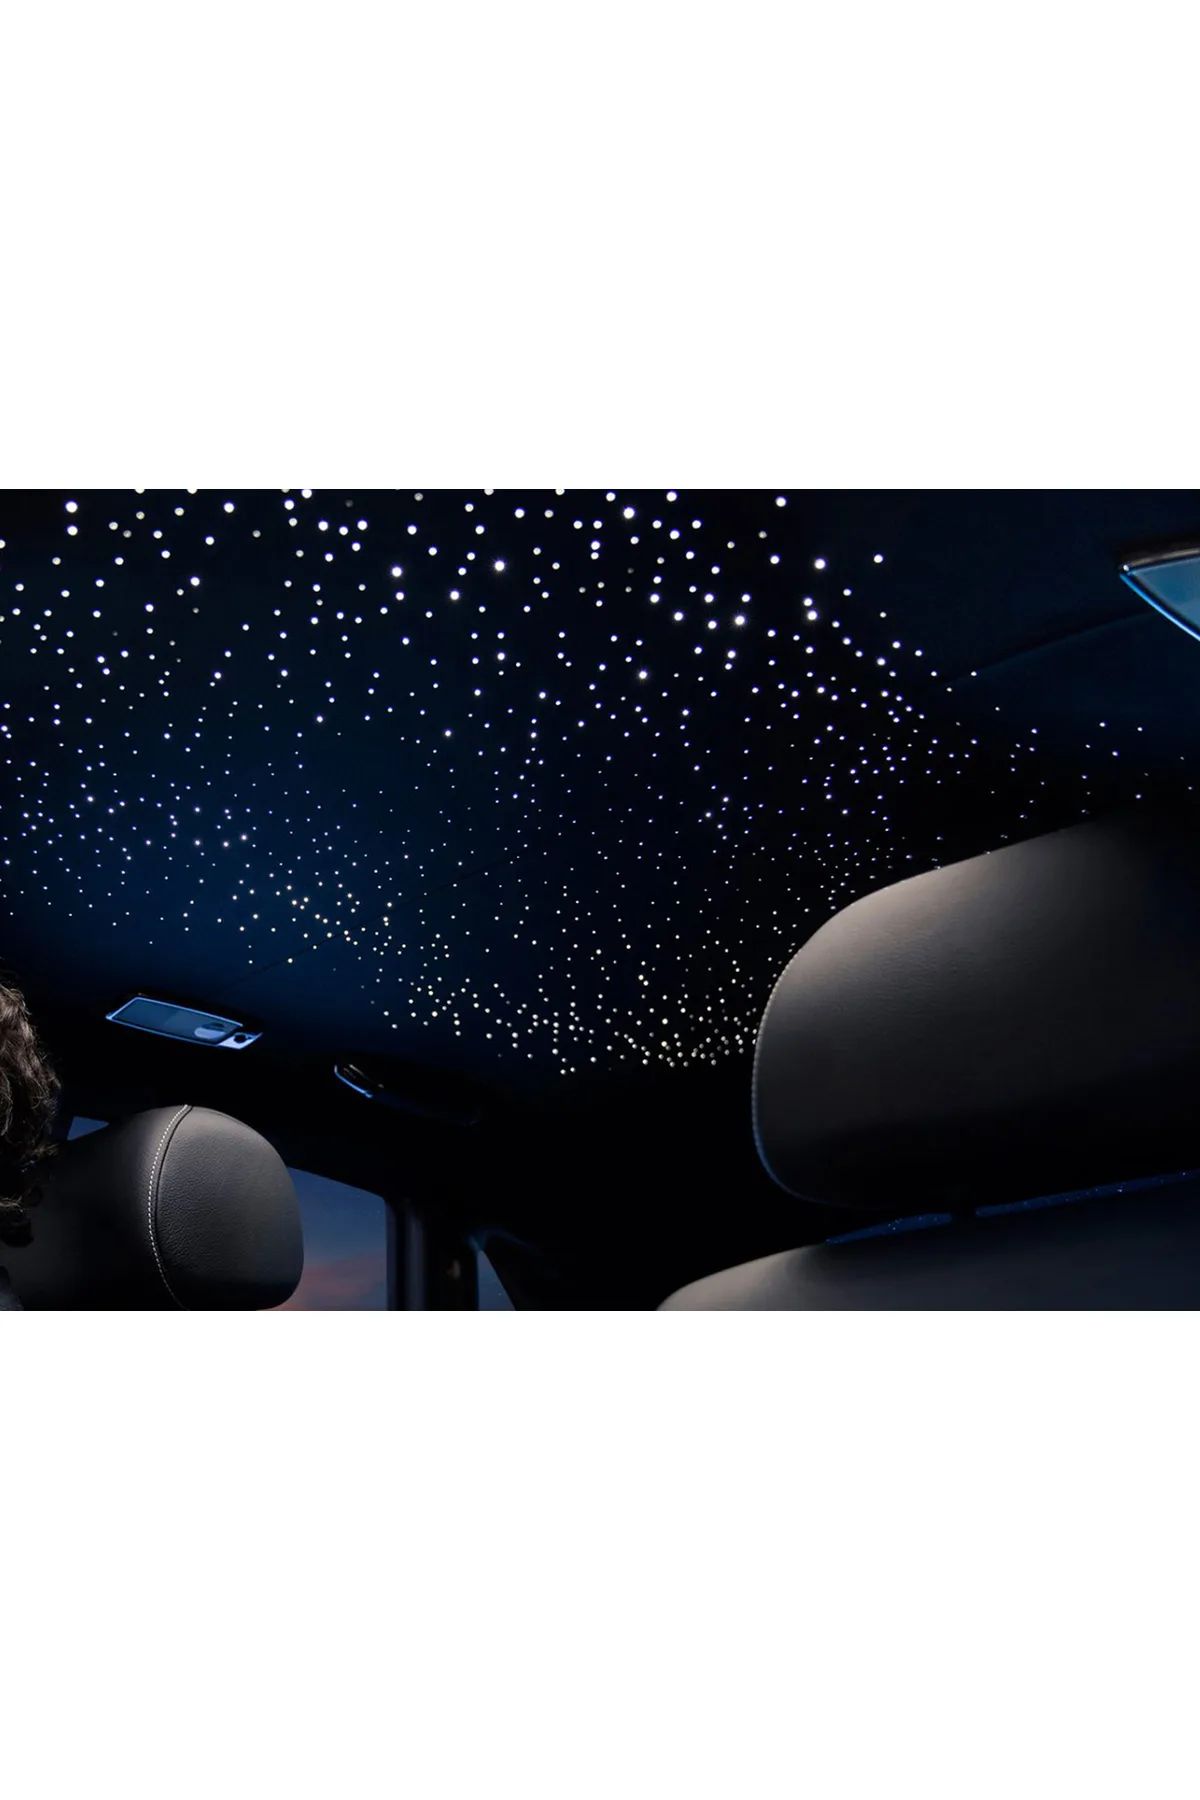
To be honest, did you know that by 2026, 65% of the in-vehicle personalization market is shifting towards lighting and ambiance systems? That's an incredible rate! On the other hand, the most dazzling part of this trend is undoubtedly the answer to the question how to install a starry headliner in a car. Consequently, this magic, once exclusive to luxury cars, can now be installed in any vehicle with the right materials and know-how. Moreover, understanding the how to install a starry headliner in a car process is the first rule of stepping into that magical world. For instance, however, in-vehicle conditions are very different from a static home environment. In addition, with vibration and temperature changes, the nature of the job changes.
Table of Contents

- How to Install a Starry Headliner in a Car? 5 Fundamental Principles for 2026
- 2026 Guide to Necessary Materials for a Car Starry Headliner
- Step-by-Step: How to Install a Starry Headliner in Your Car's Roof?
- How to Calculate the Installation Cost of a Car Starry Headliner in 2026? Budget-Friendly Solutions
- How to Install a Starry Headliner in a Car in 2026? Professional Touches and Tips
- How to Install a Starry Headliner in a Car? Frequently Asked Questions (2026 FAQ)
- How to Install a Starry Headliner in a Car? Conclusion and 2026 Pro Advice
In this guide, drawing on over a decade of industry experience, I answer the question how to install a starry headliner in a car. Furthermore, I will explain not only the installation but also how to adapt to the vibrational, temperature-variable, and electrical requirements of 2026. Additionally, based on years of observation, the details change everything.
How to Install a Starry Headliner in a Car? 5 Fundamental Principles for 2026


Direct Answer: The five fundamental principles for installing a starry headliner in a car are: selecting materials suitable for vehicle conditions, safe integration with the 12V power system, respecting airbag locations, clean and meticulous workmanship, and post-installation testing and calibration. Thus, the most critical principle in 2026 is using materials resistant to temperatures between -20°C and +80°C.
Selecting Materials Suitable for Vehicle Conditions
SEO Summary: To install a starry headliner in a car, you place fiber optik cables behind the headliner fabric in a specific pattern, connect them to an LED light source, and power this system with the vehicle's 12V electricity. Therefore, the most critical principle in 2026 is using sets specifically designed for vehicles, resistant to vibration and temperature changes.
Integrated Installation with the 12V Power System
Installing a starry headliner in a car is different from static home decor because a vehicle is an environment of constant motion, vibration, and extreme temperature fluctuations. The vehicle is constantly moving. However, it generates vibration and the interior temperature can vary between -20°C and +80°C. Therefore, every material you use must be ready to withstand these conditions. Moreover, the truth is, fiber optik from a standard home set can break or lose light transmission within a year due to the shaking inside a vehicle.
"A vehicle's electrical system is not as forgiving as your home's. Every additional load must be correctly calculated and isolated. Even in 2026 models, a simple short circuit can cost you dearly."
2026 Guide to Necessary Materials for a Car Starry Headliner


Fortunately, in 2026, the market responds to this need. Additionally, your priority should be products labeled "AUTO" or "In-Vehicle." In short, the fiber optik cable used in these products is coated with a more flexible outer sheath with high tensile strength. In summary, the adhesives are automotive-grade, resistant to cold and heat. Also, the LED light source must absolutely have a wide operating temperature range.
- Vibration-Resistant Fiber Optik Cables: Fibers with a PMMA (acrylic) core but reinforced with a special PVC or PU sheath. Thickness is typically 0.75mm or 1.0mm. You should calculate the required length in meters based on your headliner area.
- 12V LED Light Source and Driver: This is the brain of the system. In 2026, most LED projectors are now equipped with SMD LEDs that offer both low heat emission and high lumen efficiency. Be sure to choose a model with a 9V-15V DC input range and protection against overheating. Vehicle-specific products like "Durable AUTO-Series LED Projector" meet this need.
- Automotive-Grade Connection Cables and Fuse Holder: To connect the LED projector to the vehicle's electricity, you need red (positive) and black (negative) insulated cables and at least a 2A mini fuse.
Airbag and Safety Warnings
On the other hand, the second fundamental principle concerns safety. In short, your vehicle's electrical system operates on 12 volts and is built on a delicate balance. An incorrect connection can cause fuses to blow, or even damage some electronic control units. Therefore, you must perform the installation appropriately for the vehicle's electrical system, via a fuse and from a correct connection point (usually the cigarette lighter or a switched supply line). However, while the colored fiber optik sets for youth rooms found on CoraxAds.com operate on household 220V, vehicle sets have special drivers to operate on 12V DC.
2026 Vehicle Star Headliner Purchase Guide: What, Where, How to Buy?
Direct Answer: The necessary materials for a car star headliner are: vibration-resistant fiber optik cables (0.75mm or 1.0mm), a low-power 12V LED projector, automotive-grade connection cables and fuse protection, cable holders, and suitable covering material for the headliner. So, in 2026, 'AUTO' labeled ready-made sets offer 40% longer lifespan.
Step-by-Step: How to Install a Starry Headliner in Your Car's Roof?


SEO Summary: The material list for a car star headliner includes: vehicle vibration-resistant fiber optik cables, a low-power 12V LED projector, cable holders, suitable covering material for the headliner, and fuse-protected connection cables. In 2026, especially 'AUTO' or 'VIP' labeled, vehicle-optimized ready-made sets should be preferred.
- Removing the Headliner and Surface Preparation: The headliner panel is attached with clips and fasteners. Gently remove it using special trim removal tools. Place the headliner on a flat surface and clean its backside. Dust and grease residue will prevent adhesive from bonding.
- Fiber Optik Placement and Fixing Technique: Determine where the light source (LED projector) will be mounted (usually the front or rear center console area). Pass the fiber optik bundle through to the back of the headliner from this point. Now the magic begins: Lightly mark the points on the front surface of the headliner to create your desired star pattern. Then, drill through the headliner covering at these points with a 0.5-0.75mm micro drill bit. Pull the fibers through the holes to the front surface, leave about 1-2 mm protruding, and secure them tightly from the back with automotive adhesive or special clips. This fixation is crucial to prevent swaying during vibration.
The right material is half the success. So, here is what should be included in a vehicle star headliner set meeting 2026 standards:
Connecting the LED Projector and Power System
This topic is perhaps the most overlooked but the most vital. However, many modern vehicles have curtain airbags along the roof edges. Therefore, when answering the question how to install a starry headliner in a car, you must never drill into these areas, pass fiber optik cables through them, or apply adhesive to them. Also, before removing the headliner panel, be sure to learn the airbag locations from your vehicle's manual or an authorized service center.
Post-Installation Testing and Calibration
First, choosing the right product can be confusing. On the other hand, measure your vehicle's headliner area to determine the required fiber optik length. Thus, while 200-300 meters may be sufficient for a small hatchback, over 500 meters may be needed for a large SUV. The second step is to choose a set category that fits your budget and desired features. Finally, the most important point to pay attention to when purchasing is the seller's technical support and warranty terms. Consequently, inquire about the product's compliance with TSE or similar international standards. Indeed, Reference: TSE's "General Safety Rules for Electrical Lighting Devices" document can be a guide on this matter.
How to Calculate the Installation Cost of a Car Starry Headliner in 2026? Budget-Friendly Solutions

Direct Answer: Installing a starry headliner in your car's roof consists of four main steps: safely remove the headliner panel, pass fiber optik cables through micro holes and secure them, mount the LED projector in a hidden spot, and connect it to the vehicle's 12V system via a fuse. Therefore, experts insist on disconnecting the battery's negative terminal before starting work.
| Model / Feature | EKO (Economical) | STANDARD | VIP (Professional) |
|---|---|---|---|
| Fiber Optik Quality | Standard PMMA, 0.75mm | Reinforced Sheath, 0.75mm/1.0mm | High Transmission, Vibration Dampening, 1.0mm |
| LED Projector | Single Color (White), Fixed Light | Single Color, Brightness Adjustment | RGB + White, Twinkling Star Effect, Remote Control |
| Average Cost (Materials) | 800 TL - 1,500 TL | 1,800 TL - 3,000 TL | 4,000 TL and above |
| Suitable Vehicle | Used, older model vehicles | Mid-segment vehicles 2015-2020 | New model, luxury sedans and SUVs |
SEO Summary: Installing a starry headliner in your car's roof begins by safely removing the headliner panel. Furthermore, then, fiber optik cables are passed through holes drilled in the headliner covering to create the desired star pattern and secured with special adhesives. Indeed, finally, the LED light source is mounted in a hidden spot and connected to the vehicle battery via a fuse.
How to Install a Starry Headliner in a Car in 2026? Professional Touches and Tips
Before starting the installation, I strongly recommend disconnecting your vehicle battery's negative terminal. In summary, this completely eliminates the risk of a short circuit.
Maintenance and Cleaning Guide
Next, neatly insert the other ends of the fibers into the LED projector's input port and tighten the compression nut. That is, secure the projector to a hidden corner of the vehicle (under the glovebox, inside the armrest, trunk ceiling) with double-sided tape or screws. However, the final step is connecting the power cables. However, connect the projector's red wire to a switched +12V source in the vehicle (e.g., radio supply), and the black wire to the chassis or a grounding point. Absolutely add a fuse to the +12V line. A similar level of care is detailed in our guide for fiber optik application details in a Turkish bath.
How to Install a Starry Headliner in a Car? Frequently Asked Questions (2026 FAQ)
After the system is installed, it's time for the first test. First, check all connections once more. Then, reconnect the battery terminal and turn on the star headliner system. Ensure light comes evenly and brightly from all holes. If some points are dimmer, this may mean the fiber is bent or pinched at that point. Furthermore, if you have a system with twinkling stars or RGB effects, test that all functions on the remote control work properly. This way, you safely complete the final stage of the how to install a starry headliner in a car process.
1. Which vehicles is it suitable for?
Fiber optik star headliner systems can be applied to almost all vehicle interiors, including cars, SUVs, campers, minibuses, and even boat ceilings. What's important is that the headliner fabric is removable and reinstallable and that there is a suitable cavity to mount the projector. Wide, flat headliners yield the most ideal result.
2. Why are the fiber optik cables invisible behind the headliner fabric?
Fiber optik cables are transparent optical fibers that emit light only from their ends. They do not leak light from their side surfaces. Therefore, when laid behind the headliner fabric, light is only visible from the micro points where they are brought to the front surface and the holes are drilled. The cables themselves remain completely hidden behind the headliner fabric, and only the small light points forming the star effect are visible.
3. What is the lifespan of the LED projector and can it be replaced?
A quality LED light source has an average lifespan of between 30,000 and 50,000 hours. This equates to over 20 years with an average of 4 hours of daily use. Most LED projector modules are secured with screws or clips and can be easily removed and installed. In case of failure, only the projector unit needs to be replaced; you do not need to renew the fiber optik cables.
4. Can I change the star pattern or color after installation is complete?
After the fiber ends are glued and excess is trimmed, changing the position of those points is quite difficult. However, for color change, you have two options: If you used a color-changing (RGB) LED projector, you can instantly change the light color via remote control or an app. If you have a fixed-color (blue/white) projector, color change is only possible by replacing the projector itself.
5. Should I get help from a professional instead of doing this myself?
If you have experience and confidence in removing/installing your vehicle's headliner, wiring, and soldering, you can undertake this project yourself. However, especially in a luxury or new model vehicle, the headliner being attached with fragile clips and the presence of safety equipment (airbag sensors) can pose a risk. In this case, getting service from a professional specializing in auto upholstery or audio/visual systems prevents time loss and reduces the risk of potential damage to zero.
How to Install a Starry Headliner in a Car? Conclusion and 2026 Pro Advice
Direct Answer: In 2026, the installation cost for a car star headliner varies between 800 TL and 4,000 TL+ depending on the material set quality; labor cost is an additional average of 1,000 TL - 2,500 TL. The cost is calculated based on the meters of fiber optik used, LED features (single color or RGB), and the professionalism level of the installer.
Remember: The secret to a successful star headliner project is not speed, but completing each step carefully and with clean workmanship.
SEO Summary: The installation cost for a car star headliner in 2026 varies based on the chosen set, the meters of fiber optik used, and LED features. You can start with basic economical sets, while luxury sets offering twinkling stars and RGB color effects require a higher budget. Labor cost should be added if you do not plan to do the installation yourself.
The cost consists of three main components: the material set, additional accessories, and labor. In the 2026 market, in-vehicle star headliner sets generally fall into three categories. The table below helps you clearly compare these categories and facilitates budget planning for your how to install a starry headliner in a car project.
As you can see, the how to install a starry headliner in a car project can appeal to every budget. Economical sets are ideal for a first experience. But remember, labor costs in 2026 can range from an average of 1,000 TL to 2,500 TL. You can reduce this cost to zero by doing the work yourself. If you want ideas for different environments, you can also check out our guide for installing star headliner lighting over a pool.
Direct Answer: To extend the life of your star headliner system and enhance the visual effect, perform regular maintenance, protect the LED projector from overheating, clean the fiber ends with a dry microfiber cloth, and adjust the brightness level for day/night modes. 30% of 2026 sets offer music synchronization via a smartphone app.
After installation is complete, some tips are important for using the system trouble-free for many years and maximizing the visual impact. First, correctly adjust the LED projector's brightness level so the star headliner can provide a subtle glow during the day, not just on night drives. In fact, some 2026 sets offer features like pulsing to the rhythm of music synchronized via a smartphone app. Such advanced features take your vehicle's interior ambiance to the next level.
Also, regular maintenance is essential to extend the life of your star headliner. For example, the fiber optik ends on the front surface of the headliner fabric can gather dust over time. In this case, the light intensity decreases. Consequently, when cleaning the headliner, gently wipe the areas with the fiber ends using a dry, soft microfiber cloth. Never use harsh chemicals or abrasive cleaners. Moreover, ensure the area where the LED projector is mounted has air circulation; overheating is the biggest factor shortening LED lifespan.
Direct Answer: The most frequently asked questions about car star headliners are: Which vehicles are suitable? (Almost all), Why are fiber optik invisible? (They emit light only from their ends), What is the LED lifespan? (30,000-50,000 hours), Can the color be changed after installation? (Yes, with RGB projectors), Is professional help necessary? (Recommended for new model vehicles).
You can find the most curious questions and answers about installing a starry headliner in a car below. This section will help resolve any final hesitations before your project.
1. Which vehicles is it suitable for?
Fiber optik star headliner systems can be applied to almost all vehicle interiors, including cars, SUVs, campers, minibuses, and even boat ceilings. What's important is that the headliner fabric is removable and reinstallable and that there is a suitable cavity to mount the projector. Wide, flat headliners yield the most ideal result.
2. Why are the fiber optik cables invisible behind the headliner fabric?
Fiber optik cables are transparent optical fibers that emit light only from their ends, therefore they do not leak light from their side surfaces. Consequently, when laid behind the headliner fabric, light is only visible from the micro points where they are brought to the front surface and the holes are drilled. The cables themselves remain completely hidden behind the headliner fabric, and only the small light points forming the star effect are visible.
3. What is the lifespan of the LED projector and can it be replaced? Explore our how to install a starry headliner in a car collection and catch the best offers by visiting https://CoraxAds.com now.